Illumina amplicon sequencing
Sequencing of PCR amplicons to study genetic variation within small target regions.
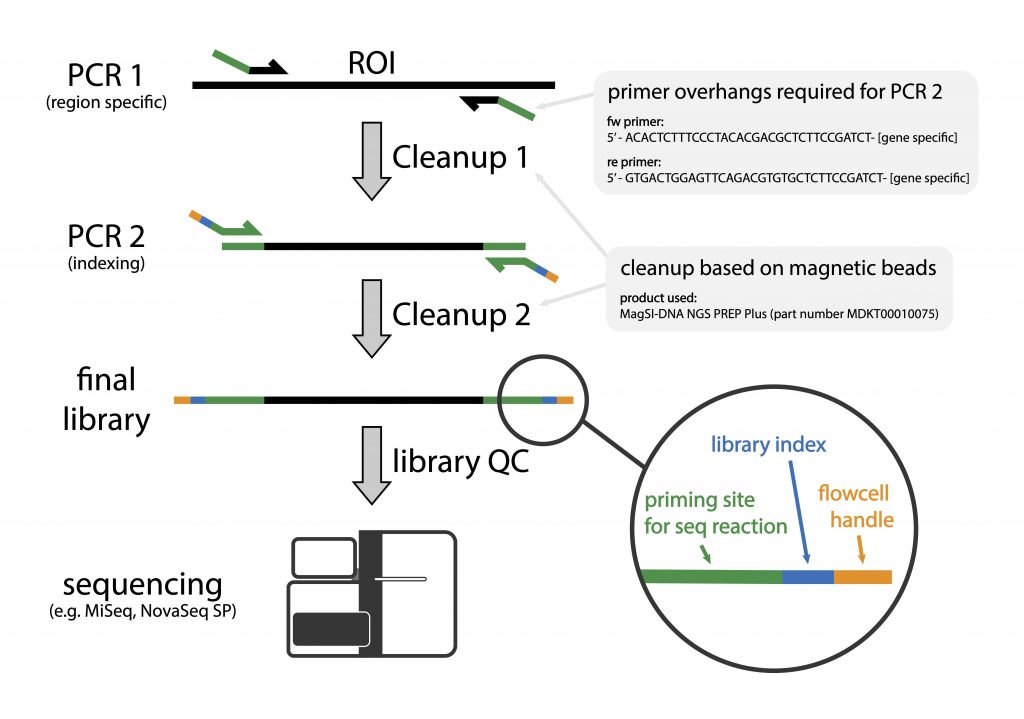
Amplicon sequencing involves sequencing of amplified loci across samples. The method involves two PCR-steps, the first amplifies a specific locus for e.g. the V3/V4 region of the bacterial 16S gene (refer to Illumina 16S Sequencing), the ITS region of fungal samples, or any locus of choice. The locus-specific primers consist of 5′- overhang handles that are used to introduce sample specific index sequences by PCR (overhangs should be compatible with the Adapterama indexing scheme – see below). The sample-specific index sequences allow individual samples to be identified after sequencing.
The application described here is suited for custom amplicons i.e. where one or more user defined loci are amplified by PCR (referred to as PCR1) by the user prior to sample delivery to NGI. Please contact us prior to ordering the primers for PCR1.
This method is primarily of interest when:
- Your locus of interest is specific to your project, for e.g. the ITS for fungal samples, projects on the archaeome, or any locus of choice. (NB: We need you to perform PCR1 on all your samples)
- You have strongly variable input concentrations.
- You need to use a different PCR setup (reaction sizes, polymerases, etc) than supported by the protocol we offer.
- Your locus of interest is difficult to amplify and/or the PCR product requires excision from a gel followed by purification.
Therefore the starting material we ask for is an amplified PCR-product. Please consult Illumina 16S sequencing if you are interested in exploring the content of bacterial gDNA in your samples.
We also recommend that you get in touch with us to discuss your project since we would be able to guide you on the primers you would need for PCR1.
However, if you have previous experience working with this method and would like to place an order directly, please ensure that you use primers compatible with the Adapterama indexing scheme.
We no longer offer the Andersson scheme and it is the user’s responsibility to ensure that samples have the correct overhangs.
We would also like you to perform a test PCR (for PCR2) on a few of your samples since we require this as confirmation that the overhangs that were a part of the primers that were used for PCR1 are compatible with the primers that we use for PCR2.
We will send you the primers and ask you to do this experiment. More details in the following sections.
Sample requirements
We do not perform quality checks on samples submitted to us. This means that we assume that you have performed the checks we ask for and provide us with samples that are ready to go.
1. PCR 1 cleanup performed by user
- Sample Type: Purified PCR fragment of interest (amplified with suitable primers), and eluted in water or TE.
- Sample Amount: 0.25-0.8 ng/μl
- Sample Volume: 20 μl
- Sample QC: The concentration of the PCR-purified product should be measured fluorometrically for e.g. with a Qubit using the HS DNA kit. In addition we would like to have a gel image of the PCR products for a representative group of samples.
- Maximum number of samples/plate: Maximum number of samples/plate: 94, leave the last two wells in column 12 empty (please do not add water or buffer). We will place our controls in these.
- sequences of primer overhangs:
- fw primer: 5′ ACACTCTTTCCCTACACGACGCTCTTCCGATCT – [your gene specific primer]
- re primer: 5′ GTGACTGGAGTTCAGACGTGTGCTCTTCCGATCT – [your gene specific primer]
Please contact us if you have any questions.
2. PCR 1 cleanup performed by NGI
- Sample Type: PCR fragment of interest in PCR reaction using compatible primers
- Sample Amount: 0.5 – 4.5 ng/ul. All samples are to have the same concentration i.e. they should be normalised. Please note that there will be approximately 20% sample loss during bead purification.
- Sample Volume: equal volume for all samples, 50 μl
- Sample QC: The concentration of the PCR-purified product should be measured fluorometrically for e.g. with a Qubit using the HS DNA kit. In addition we would like to have a gel image of the PCR products for a representative group of samples.
- Maximum number of samples/plate: 94, leave the last two wells in column 12 on the plate empty (please do not add water or buffer!).
- sequences of primer overhangs:
- fw primer: 5′ ACACTCTTTCCCTACACGACGCTCTTCCGATCT – [your gene specific primer]
- re primer: 5′ GTGACTGGAGTTCAGACGTGTGCTCTTCCGATCT – [your gene specific primer]
3. PCR 1 and PCR 2 including cleanup performed by you
As an alternative to sending your PCR 1 products to us, you may also complete the PCR 2 yourself and send in a final pool of all libraries. We have pre-made index plates (in total 384 unique dual indexes) that you can purchase from us. The PCR 2 indexing primers are compatible with any PCR 1 primers that contain the overhang sequences described above. Please follow our sample requirements for user-prepared libraries.
Our PCR2 protocol including bead cleanup can be found below.
An Excel file with the complete information for index plates A-D can be found below.
Conditions for test PCR2 to be performed by the user
We will send you an aliquot of the Illumina indexing primers and would like you to test them on a couple of representative samples according to the protocol below.
We require the results of this test PCR2 as a confirmation that the overhangs of primers used for PCR1 are compatible with the primers that we use for PCR2.
PCR reaction
– Sample (≤ 5ng) up to 8ul
– Kapa HiFi HotStart 2x Master Mix 10ul
– Index primer mix 4ul
– Water as needed to total volume of 20ul
PCR setup
1. Denaturation @ 98°C, 2min
2. Denaturation @ 98°C, 20 s
3. Annealing @ 55°C, 20 s
4. Elongation @ 72°C, 15 s
5. GO TO step 2, 8 cycles
6. Final elongation @ 72°C, 2 min
Run all the products on a 1.5 – 2 % agarose gel to check for the presence of one product (usually between 300 and 800 bp). Where feasible, please run the template (product of PCR1) alongside the product of PCR2 to clearly visualise the size difference. The image of this gel needs to be submitted to us along with the sample information sheet we send you with the other documents for your project. BioAnalyzer or Fragment Analyzer images of the PCR products are also acceptable.
Evaluating Sample Quality
The concentrations of all the samples submitted to NGI need to be estimated fluorometrically for e.g. on a Qubit instrument using the Qubit HS DNA kit and the products of PCR1 should also be checked by agarose gel electrophoresis or using a TapeStation/Fragment Analyzer.
If you are not able to carry out these steps, or your samples are below the required thresholds, please get in touch.
What we do with your samples
Library preparation
1. Without PCR 1 cleanup
We use the samples you provide us with as a template for PCR2 without doing any clean-up step ourselves. It is therefore essential that PCR1 is carried out using primers that are compatible with this indexing scheme (please contact us if you have questions). We also rely on your DNA concentration measurements; they should be within our range to account for sample loss during the bead-based library purification step that is carried out using MagSI beads.
We will run a negative control and a positive control on each plate (in wells H11 and H12), to exclude any sources of contamination during sample processing at NGI. Therefore if the controls look like they should, we will need to assume that the prep was accurately done regardless of whether the user’s samples yield a library.
2. With PCR 1 cleanup
We begin with a clean-up step of the products of PCR1 that you supply us with. This is followed by PCR2 that adds the Adapterama indices. It is therefore essential that PCR1 is carried out using primers that are compatible with this indexing scheme. Please contact us if you have any questions. We also rely on your DNA concentration measurements; they should be within our range to account for sample loss during the bead-based library purification step that is carried out using MagSI beads.
We will run a negative control and positive control on each plate, to exclude any sources of contamination during sample processing at NGI. Therefore if the controls look like they should, we will need to assume that the prep was accurately done regardless of whether the user’s samples yield a library.
Library QC and sequencing
After the above-described steps, we measure the concentration of all libraries and the average fragment size of a subset of libraries. We will inform you of these results if less than 70% of all libraries pass these steps to discuss how to proceed. If more than 70% pass, we will directly pool the ones that pass and proceed to sequencing.
Sequencing will be carried out following the setup stated in the agreement.
Expected results
We have successfully generated and sequenced libraries across multiple projects using this protocol. However, library preparation is strongly influenced by the concentration of the input material. Different sample types might produce variable results due to the presence of PCR inhibitors or incorrect measurements of DNA content due to contaminations.
Since we do not check for these issues in individual samples, we assume that we have been provided with samples that match our requirements. If a library preparation fails but our control behaves as expected, works we will not repeat the preparation.
Bioinformatics
Last Updated: 3rd April 2024